

If you are a super admin in the HubSpot CRM Platform, you might have noticed some new features and improvements in the past few weeks. These updates are designed to help you manage your data, workflows, and users more efficiently and effectively.
In this blog post, we will highlight some of the most important updates and how you can use them to optimize your HubSpot experience.
CRM Platform
Manage Existing Values in Imports
One of the challenges of importing data into HubSpot is dealing with duplicate or conflicting values. For example, if you have a spreadsheet of deal data that includes a deal amount column, and you want to import it into HubSpot, what happens if some of the deals already have a deal amount value in the CRM? Do you want to overwrite the existing value with the new one or keep the original one?
Previously, HubSpot did not give you much control over this scenario. You could either choose to overwrite all existing values with the new ones or skip all rows that had an existing value. This could result in losing some valuable data or creating inconsistencies in your CRM.

Source: HubSpot
Now, HubSpot offers a more flexible and granular option: you can choose not to overwrite existing values for specific properties and objects in your import file. This applies to all objects (contacts, companies, deals, tickets, products, line items) and to import files that include a Record ID column.
Why is this feature useful?
This feature allows you to manipulate your data with more control and precision. For example, you can now import a spreadsheet of deal data and decide that if the deal amount is already known in the CRM, ignore the value that might be present for that property in your spreadsheet. This way, you can preserve the accuracy of your data and avoid overwriting important information.
How to use this feature?
To get started, navigate to the Settings menu and select Data Management. From there, click on Import & Export and select Start an Import. You will then be prompted to choose the object type and file format that you are importing. Once you have selected your options, upload your file and map your properties.
On the Review page, you will be presented with Advanced options. Click on this, and you will see an option to select "Do not overwrite existing property values" under Existing record options. This is a great feature to ensure that you don't accidentally overwrite important data that you have already collected. You can also choose the specific properties that you want to exclude from overwriting.
Once you have made your selections, click Next and then Finish Import. Voila! Your data has been successfully imported into HubSpot. With this easy and efficient process, you can spend less time on data entry and more time on growing your business.
Live Now 🚀 - Available to all Hubs from Starter+
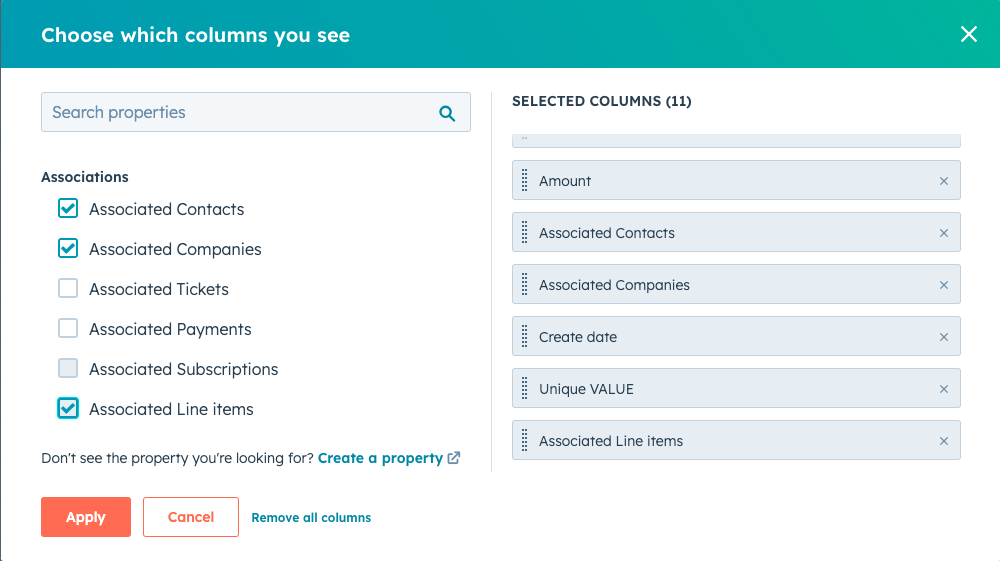
Associated Line Items ID in Deals Export
Another improvement that HubSpot has made is adding the ability to include associated line item IDs on the deals index page and by extension, export these line item IDs. This feature is useful for users who want to update line items in bulk using imports.
Why is this feature useful?
Line items are records that represent individual products or services that are associated with a deal. They can have properties such as name, quantity, price, discount, etc. You can create and edit line items manually in HubSpot or import them from external sources.
However, if you want to update existing line items that are already associated with deals in HubSpot, you need to have a way to reference them in your import file. Previously, there was no easy way to do this. You had to either use custom properties or manually copy and paste the line item IDs from HubSpot.
Now, HubSpot has added a new property called Associated Line Items ID to the deals object. This property shows the IDs of all the line items that are associated with a deal. You can add this property to your deals index page columns and export it along with other deal properties. Then, you can use these line item IDs in your import file to update existing line items.
Source: HubSpot
How to use this feature?
To easily update line items associated with deals in HubSpot, go to Sales > Deals and click on Edit columns. Add the Associated Line Items ID property to your columns and select the deals that you want to export.
Click on Export, and choose the file format and properties you want to include. You can now copy the line item IDs from your export file and use them to update existing line items in your import file. This feature saves you time and effort while streamlining your workflow.
Live Now 🚀 - Available to all Hubs from Starter+
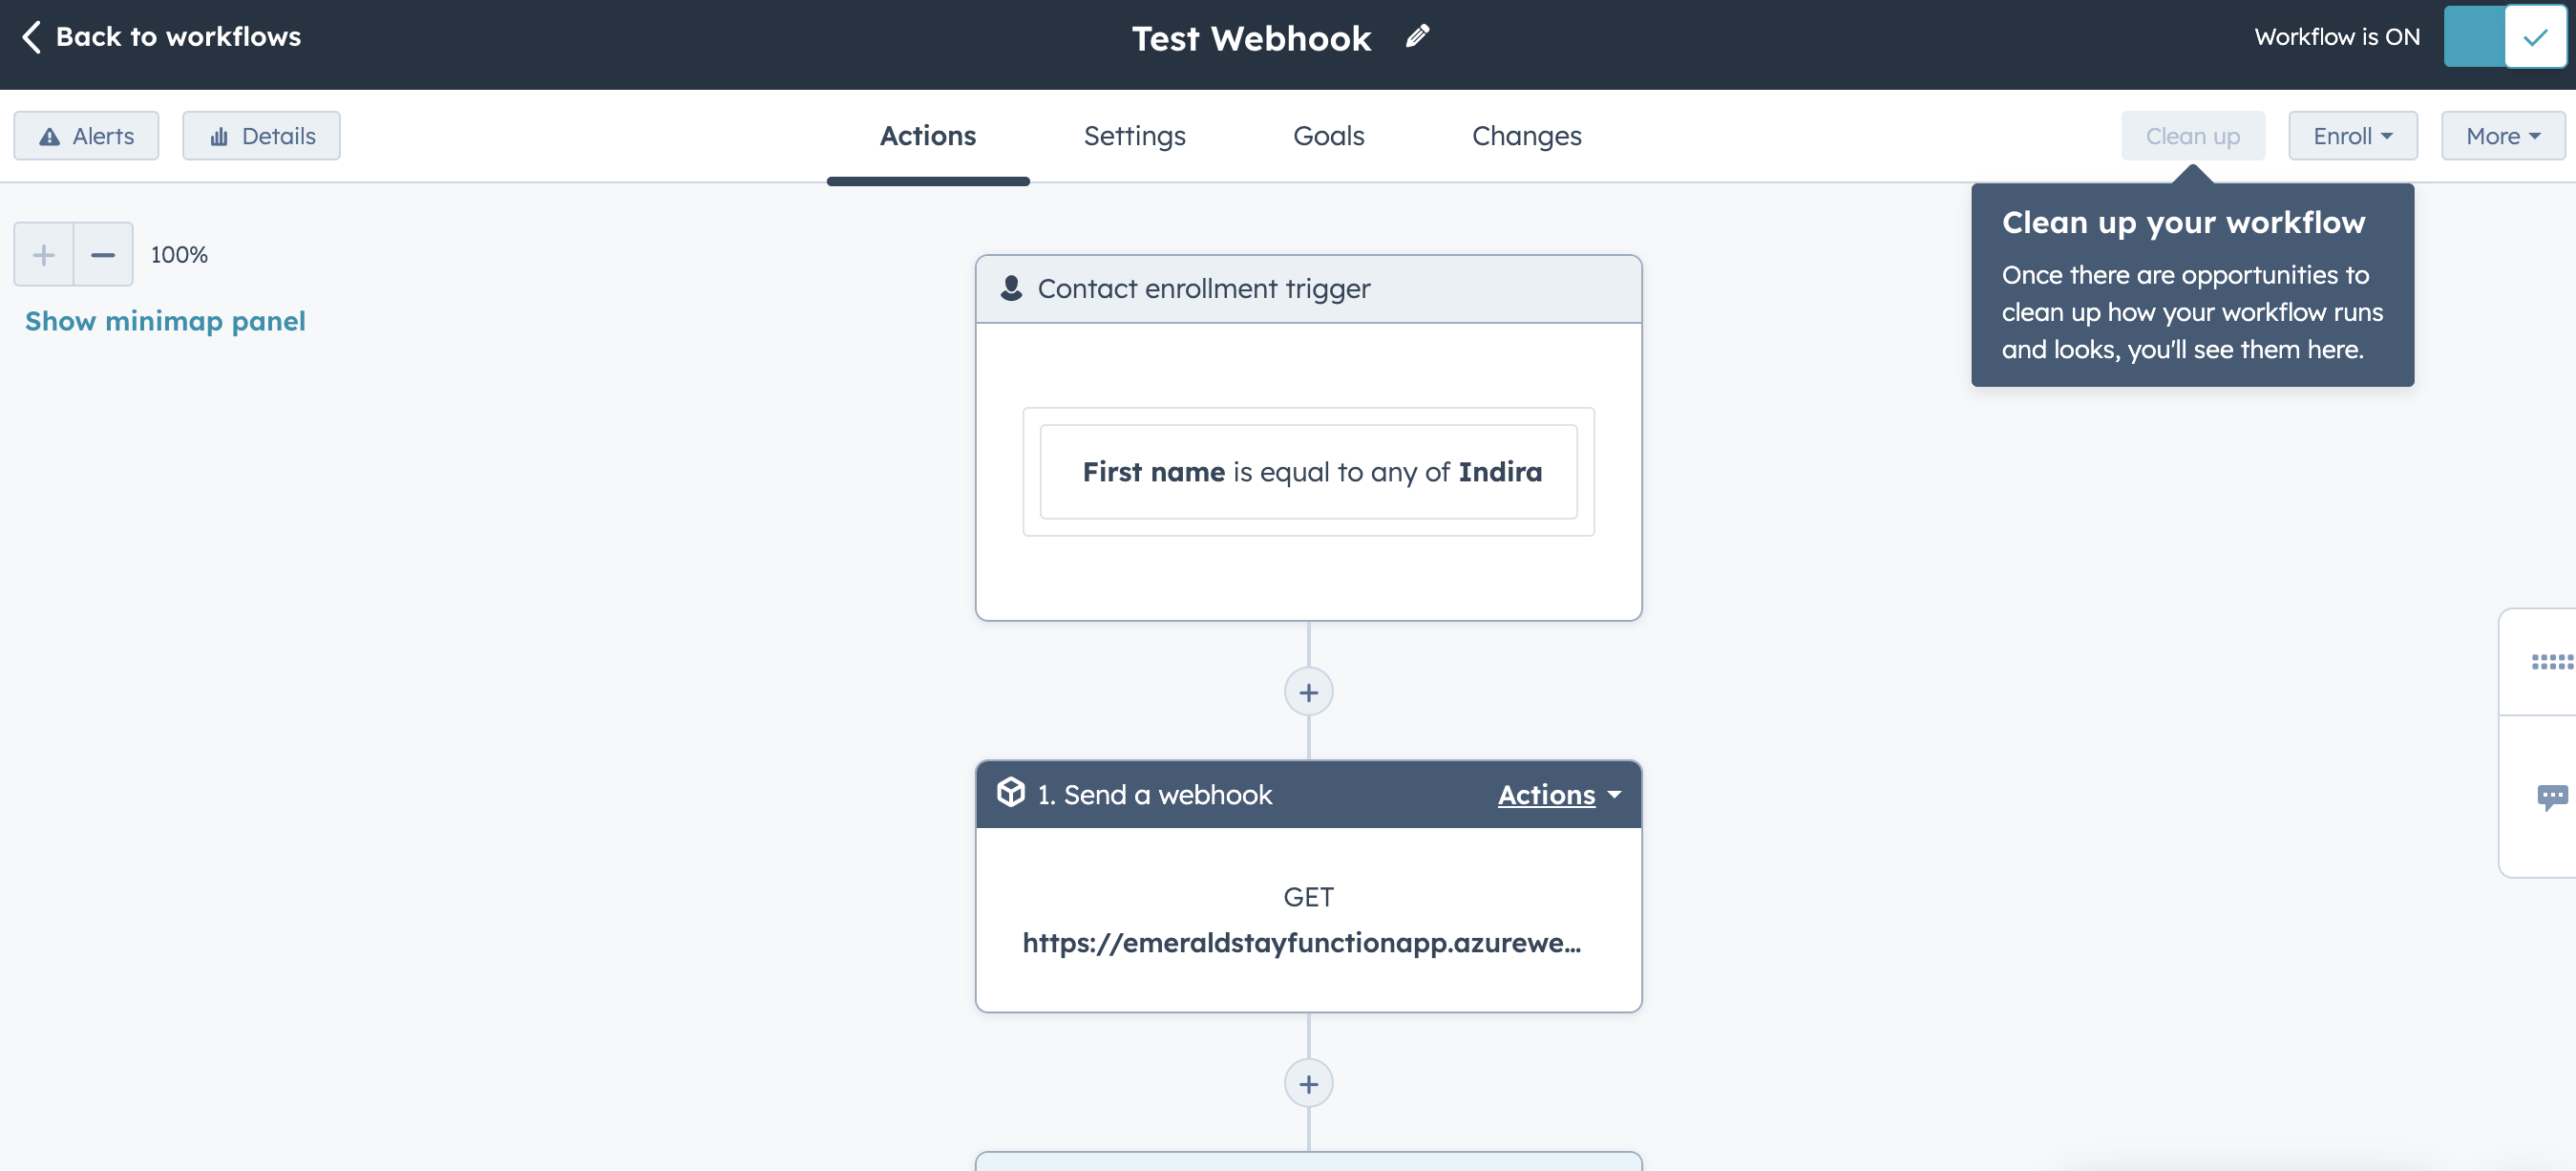
Clean Up Your Workflow Branches
Workflows are powerful tools that allow you to automate actions based on triggers and conditions. You can use workflows to send emails, create tasks, update properties, enrol contacts into other workflows, etc. You can also use branches to create different paths for different scenarios in your workflow.
However, creating complex workflows with multiple branches can be challenging and confusing. Sometimes, you might end up with branches that are redundant or unnecessary. For example, you might have two branches that have the same condition but different actions. Or you might have a branch that has no actions at all.
Why is this feature useful?
To help you optimize your workflow performance and simplify how it looks, HubSpot has introduced a new feature called Clean Up. This feature will analyse your workflow branches and give you recommendations on how to improve them. For example, if you have a workflow with multiple if/then branches that check for the same property value, you can use the "Clean up" recommendation to replace them with a single branch based on that property.
Source: HubSpot
This will not only improve your workflow's performance and efficiency but also simplify how it looks and make it easier to understand and maintain.
How to use the workflow clean-up feature?
To use the "Clean up" optimisation, go to any workflow in your account and click on the "Optimize" tab. You'll see a list of recommendations that you can apply or dismiss. If you apply a recommendation, you'll see a preview of how your workflow will change before you confirm it.
Live Now 🚀 - Available to all Hubs from Pro+
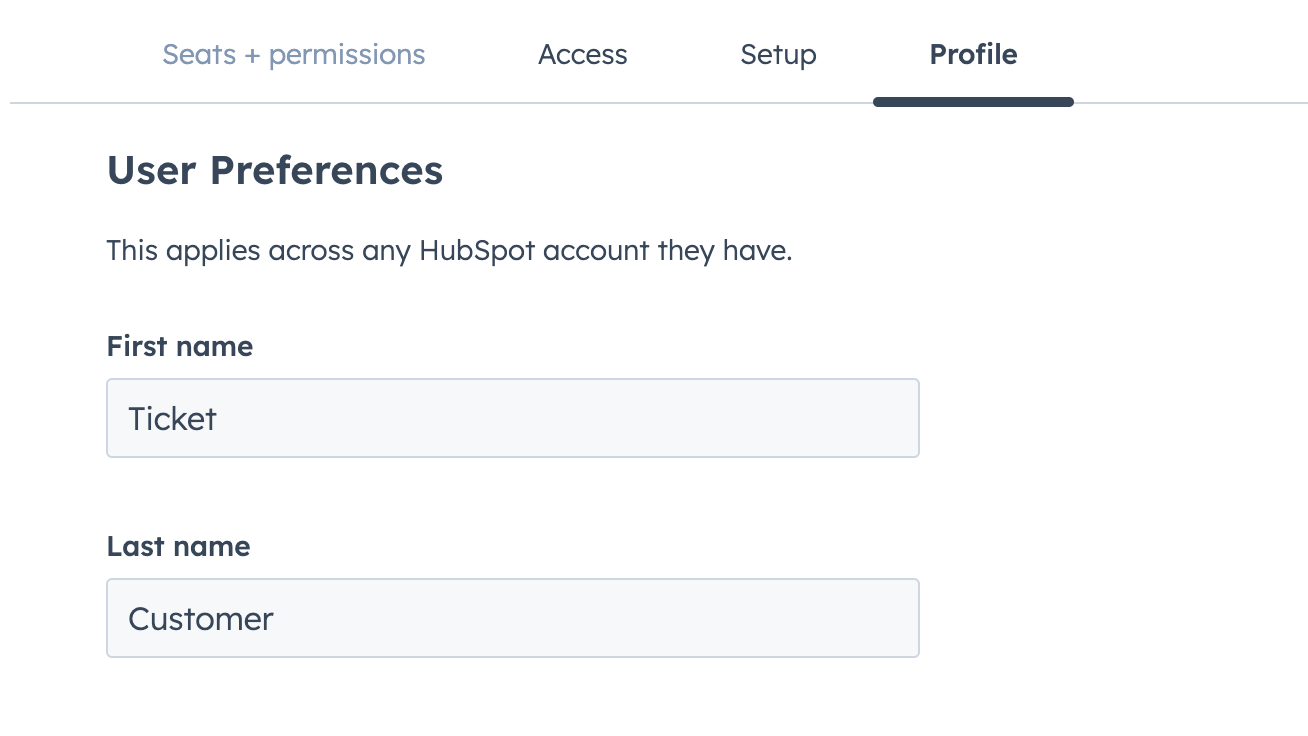
Edit User First Name & Last Name
As a super admin, you want to have full visibility and control over your users in HubSpot. That's why we're excited to introduce a brand new, full-width User record that gives you a bigger picture of your users in HubSpot.
Source: HubSpot
With this new feature, you can see more information about your users at a glance, such as their roles, team, permissions, email settings, integrations, activity history, and more. You can also take actions on behalf of your users, such as resetting their passwords, revoking their access, or changing their email addresses.
Why is this feature useful?
One of the most requested features from super admins is the ability to edit a user's first and last name in HubSpot. We understand that sometimes you may need to update a user's name due to various reasons, such as typos, name changes, or preferences.
How to use this feature?
To do this, simply go to Settings > User & Teams, select any user to open the user's record and select the tab Profile. You'll be able to edit their first and last name and save the changes.
Public Beta 🤖 - Available to all Hubs from Free+
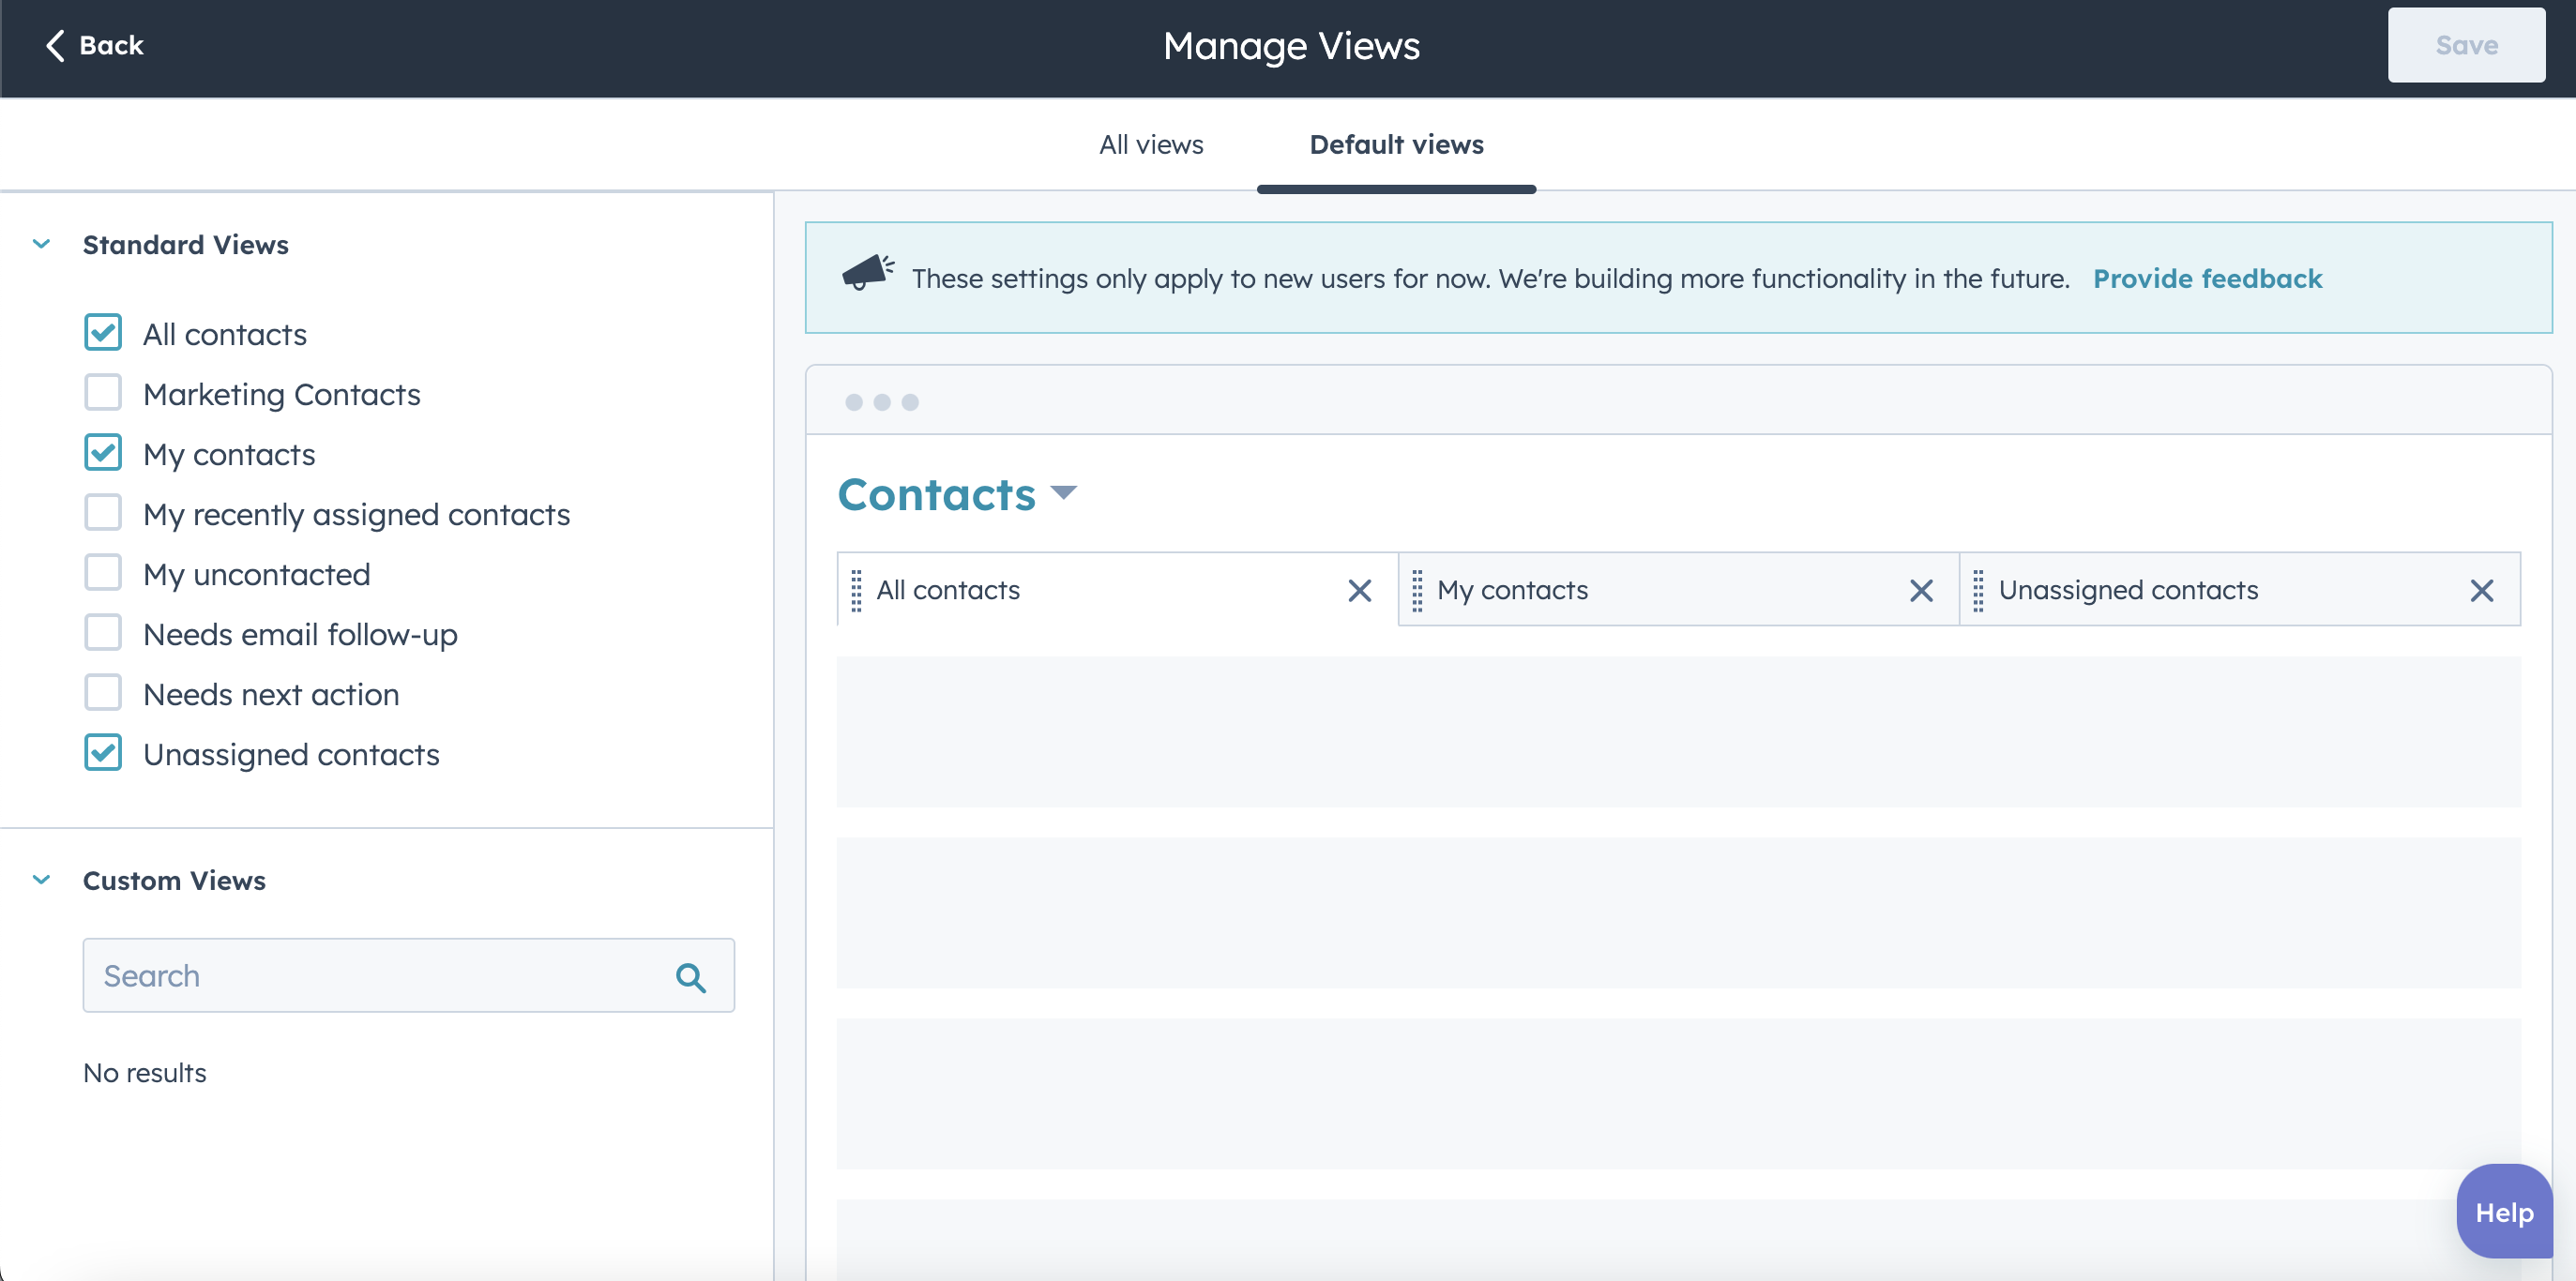
Set ‘Default Views’ for Index Pages
Index pages are where you can view and manage all your records in HubSpot, such as contacts, companies, deals, tickets, etc. You can customize your index pages by creating filters, views, columns, charts, and more.
Source: HubSpot
Why is this feature useful?
As a super admin, you may want to ensure that your new users have a consistent and optimal experience when they first come to the index pages. You may want them to see certain views by default that match your organization's best practices or goals.
How to set default views?
From any index page, select All Views. There you can select the views that you want to apply, and now admins would be able to see the tab Default Views.
When setting default views for your index pages, simply select the views you want to customise from the checkboxes sidebar. You have the option to choose from HubSpot's pre-defined standard views or any custom views that have been shared with "Everyone". Keep in mind that "Private" or "team only" views won't appear in the selection list. Reorder how you would like the views to display and click Save.
Please note: Any updates made to the default views will only affect new users or those who have not made any modifications to their index pages yet.
Live Now 🚀 - Available to all Hubs from Free+
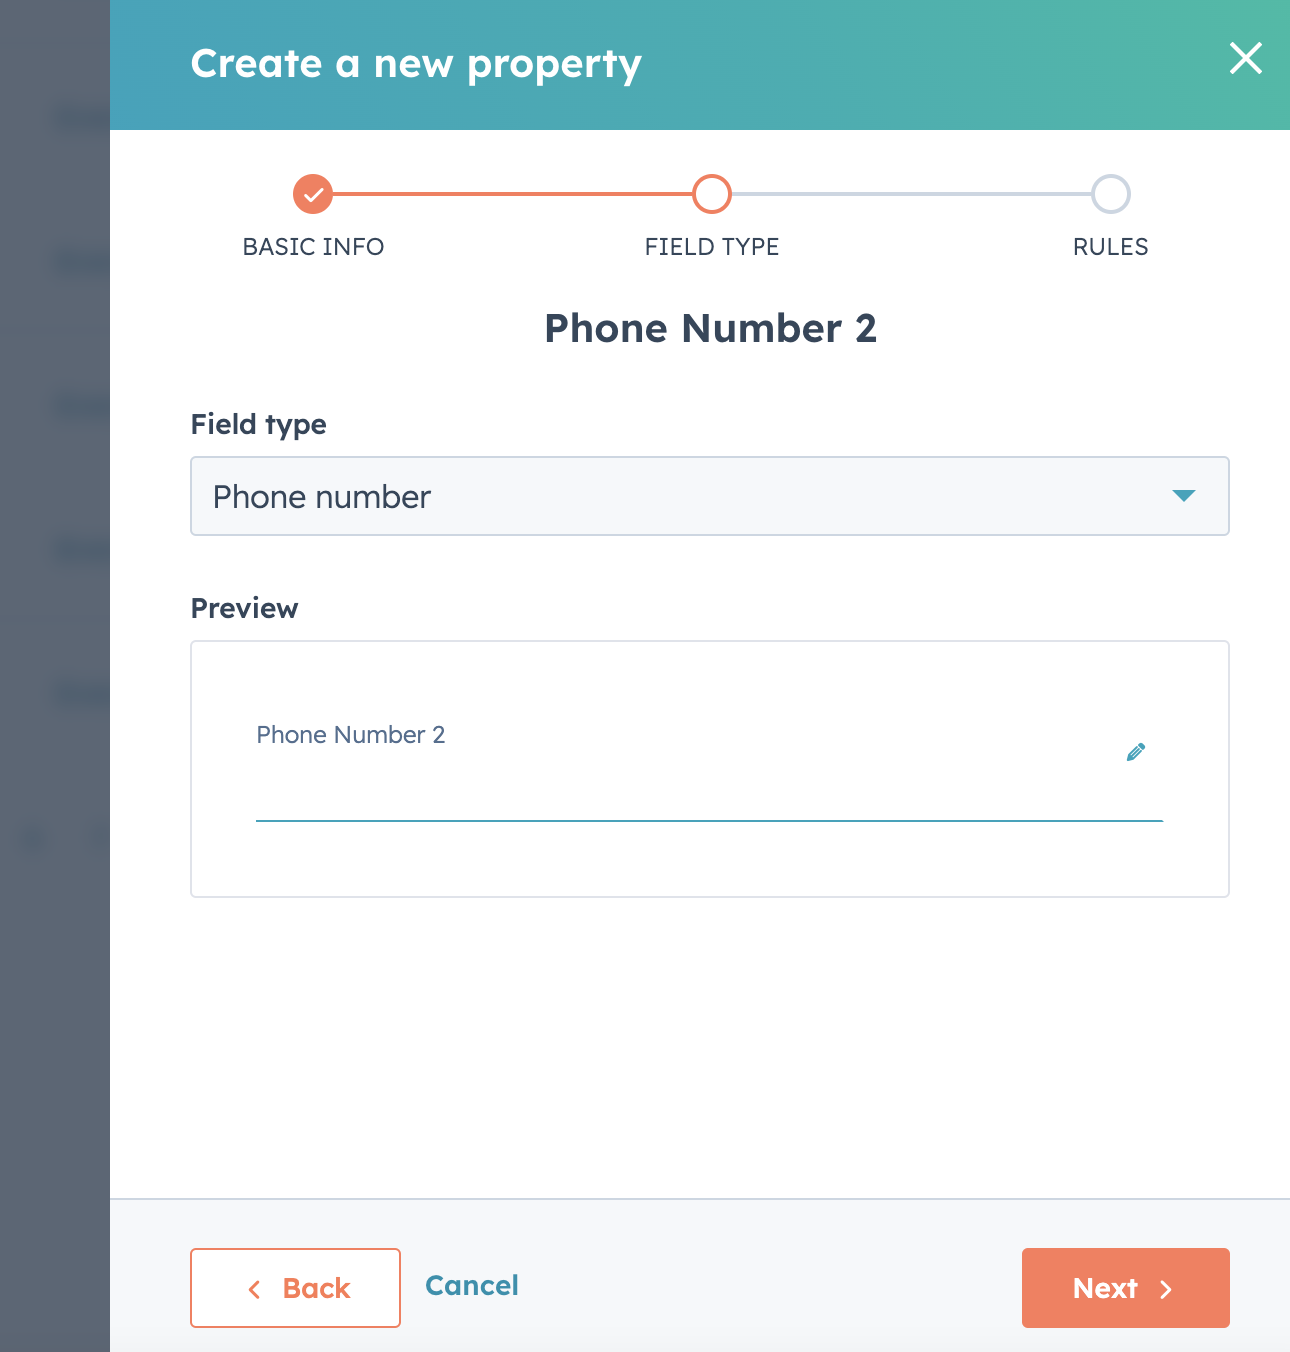
New Phone Number Property Type
As a super admin, you know how important it is to have accurate and consistent data in your CRM. Phone numbers are one of the most common and essential pieces of information that you need to collect and use for your contacts, companies, deals, tickets, and other objects. However, phone numbers can also be tricky to handle, especially when you have to deal with different formats, country codes, extensions, and other variations.
Why is this feature useful?
HubSpot offers three default phone number properties: phone, mobile phone, and fax. These properties automatically format and validate the numbers stored in the CRM based on the country code. For example, if you enter "+18884827768" in the phone field, HubSpot will recognize that it is a US number and display it as "(888) 482-7768". This makes it easier for you and your team to read and use the numbers without having to worry about parsing or converting them.
Source: HubSpot
Until now, you had to use text or number property types for these custom phone numbers. But these property types do not offer the same formatting and validation features as the default phone number properties. That means you had to manually enter and format the numbers yourself, which can be time-consuming and error-prone. It also means that you have to deal with inconsistent and messy data in your CRM, which can affect your reporting and communication.
That's why we are excited to introduce the new phone number property type. This property type allows you to create custom phone number properties that take advantage of the same formatting and validation features as the default phone number properties. That way, you can use custom phone number properties to store any kind of phone number on any object without having to deal with the frustration of parsing through dozens of number formats, country codes, and other inconsistencies.
How to use this feature?
The phone number property type works similarly to the default phone number properties. When you create or edit a custom property, you can now select "phone number" as the property type. This will enable standard formatting and validation for the property based on the country code.
Whether you're creating a new property or converting an existing one, selecting the "phone number" property type will automatically format valid values with a country code (e.g., "+18884827768" becomes "(888) 482-7768"). Don't forget to include extensions by entering 'ext' (e.g., '+18884827768 ext 123' becomes "(888) 482-7768 x123"). If you prefer to get creative with your formatting, simply click "remove number formatting" and input any characters. Conversely, you can click "apply number formatting" to format an unformatted number.
Note: Stay tuned for the upcoming feature that will allow users to call custom phone number properties. This exciting functionality is just around the corner.
Public Beta 🤖 - Available to all Hubs from Free+
Marketing Hub
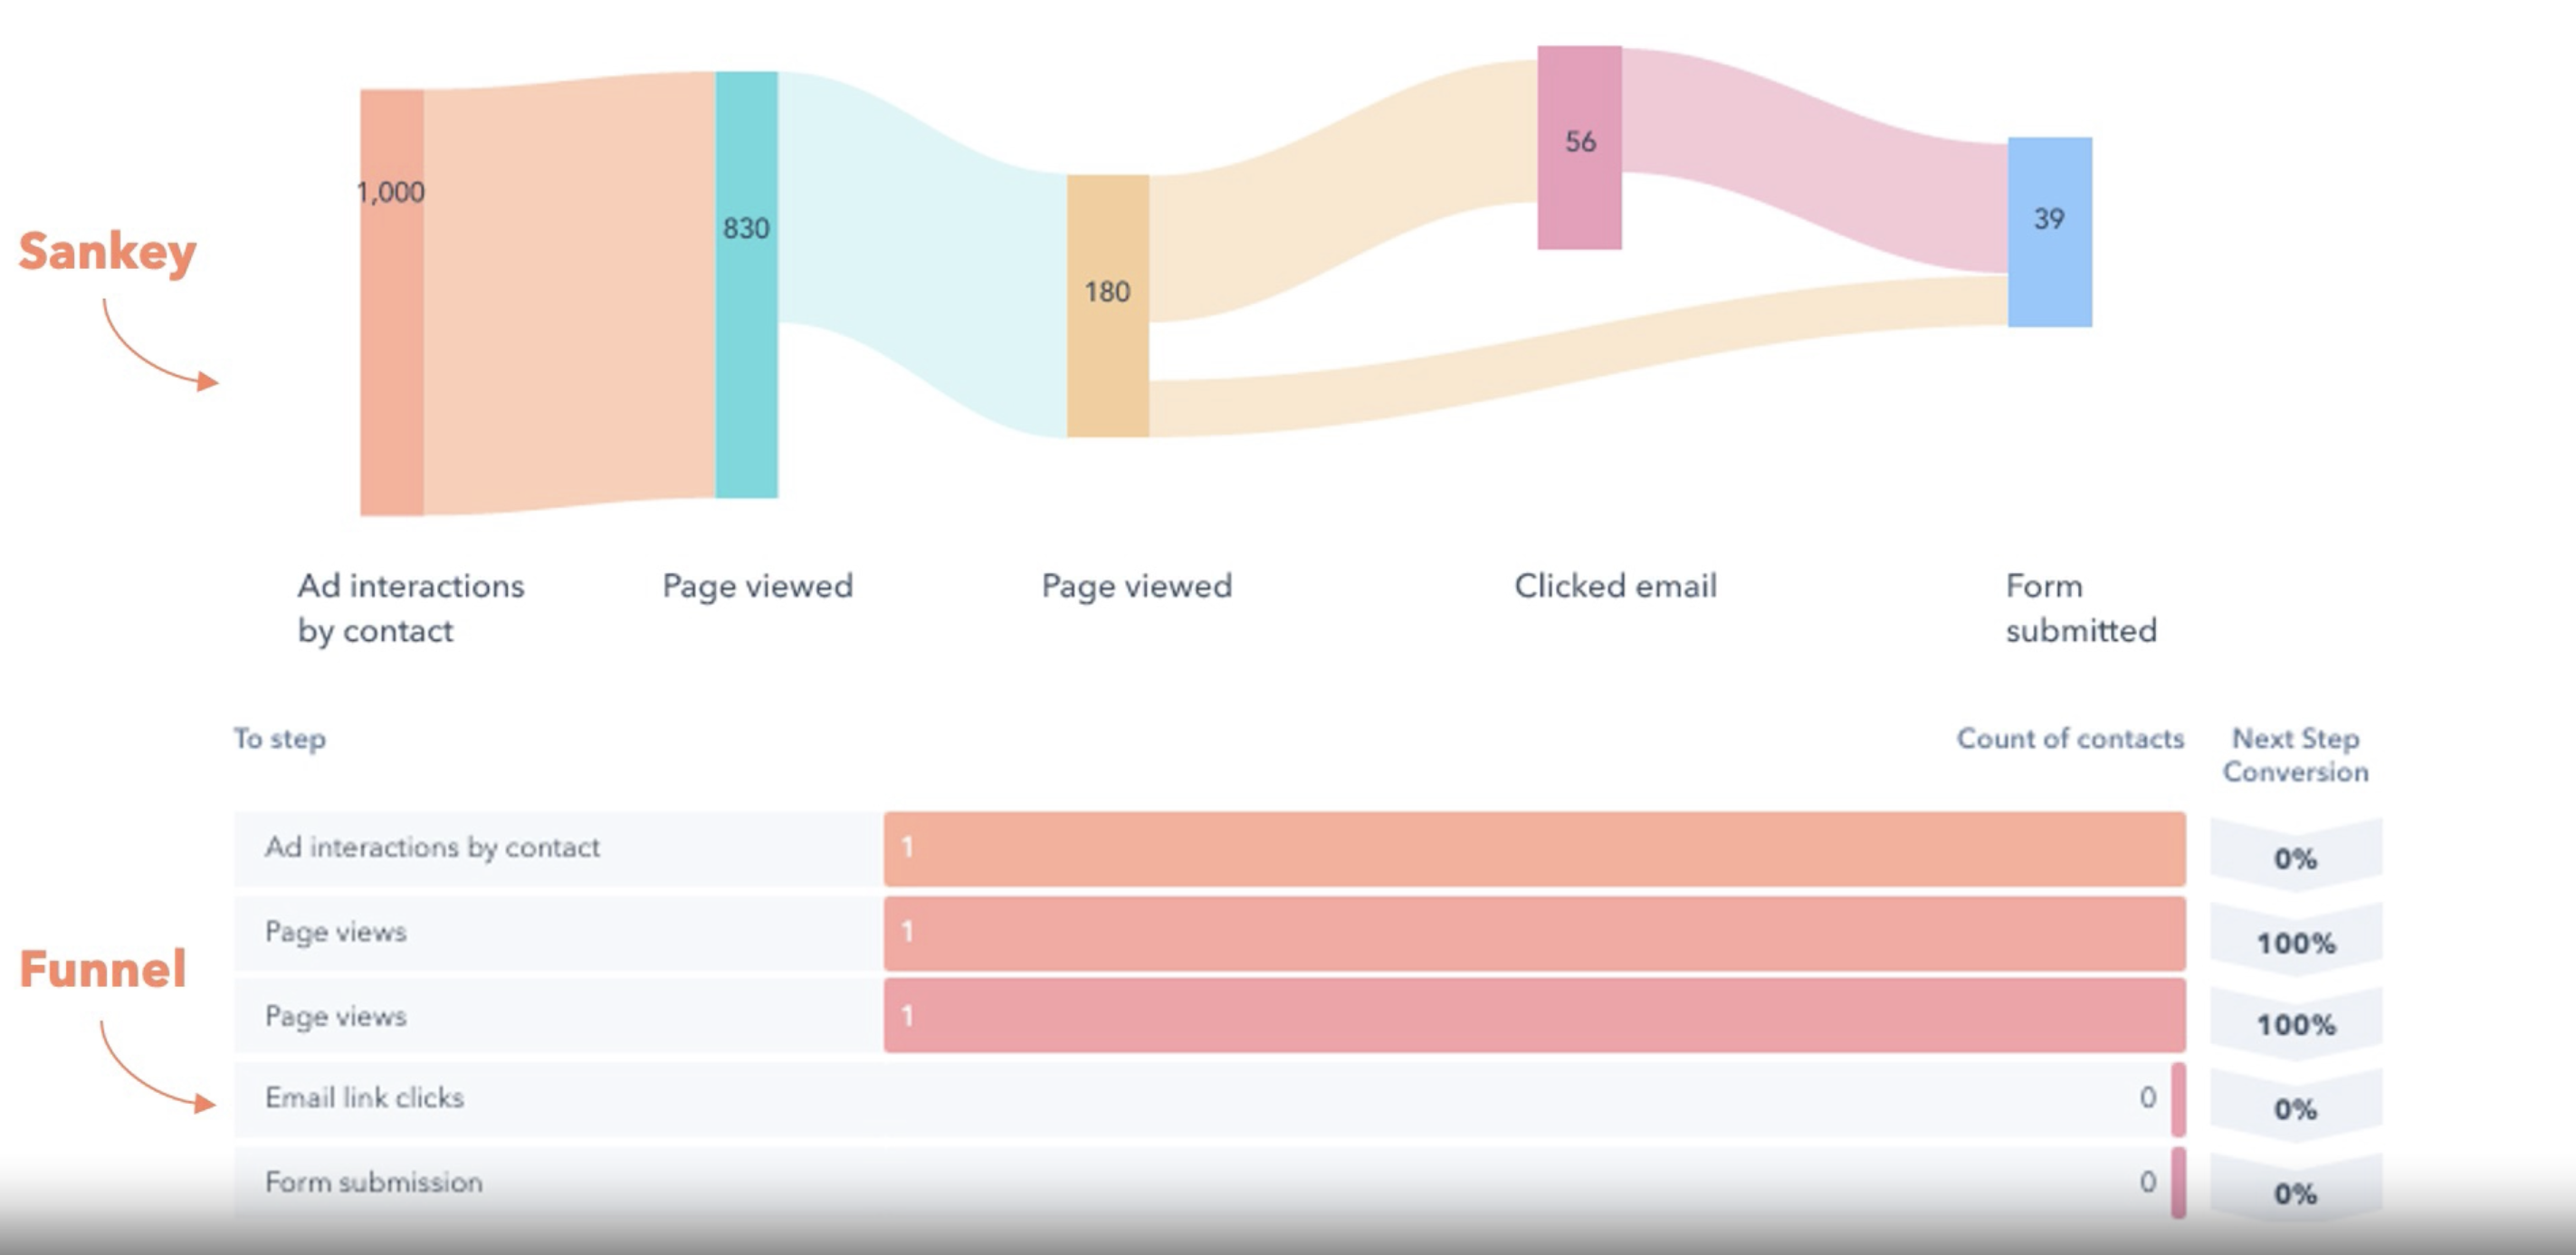
Customer Journey Analytics
This is a powerful reporting tool that lets you measure and optimize any part of the buyer's journey. You can track the journey between any starting point and any endpoint in the journey, such as from viewing a landing page to becoming a customer. You can also see how long it takes for leads and customers to complete a journey, where they are dropping off in the journey, and which pathway is the most effective at reaching your goals.
Source: HubSpot
Why is this feature useful?
Because it helps you understand how your marketing efforts are impacting your business outcomes. By analysing the touchpoints that influence your customers' decisions, you can identify what works and what doesn't in your marketing strategy. You can also discover new opportunities to improve your conversion rates, retention rates, and revenue.
How to use Customer Journey Analytics?
To access Customer Journey Analytics, go to Reports > Analytics Tools in your HubSpot account. Click on Customer Journey Analytics and then click on Create Report.
You will be able to choose a starting point and an endpoint for your journey report. You can also add filters to narrow down your audience or touchpoints. For example, you can include only contacts from a certain list or only touchpoints from a certain campaign.
Once you create your report, you will see a visual representation of the journey with metrics such as average time to complete, completion rate, drop-off rate, and conversion rate. You can also drill down into each touchpoint to see more details and insights.
Live Now 🚀 - Available to Marketing Enterprise Customers.
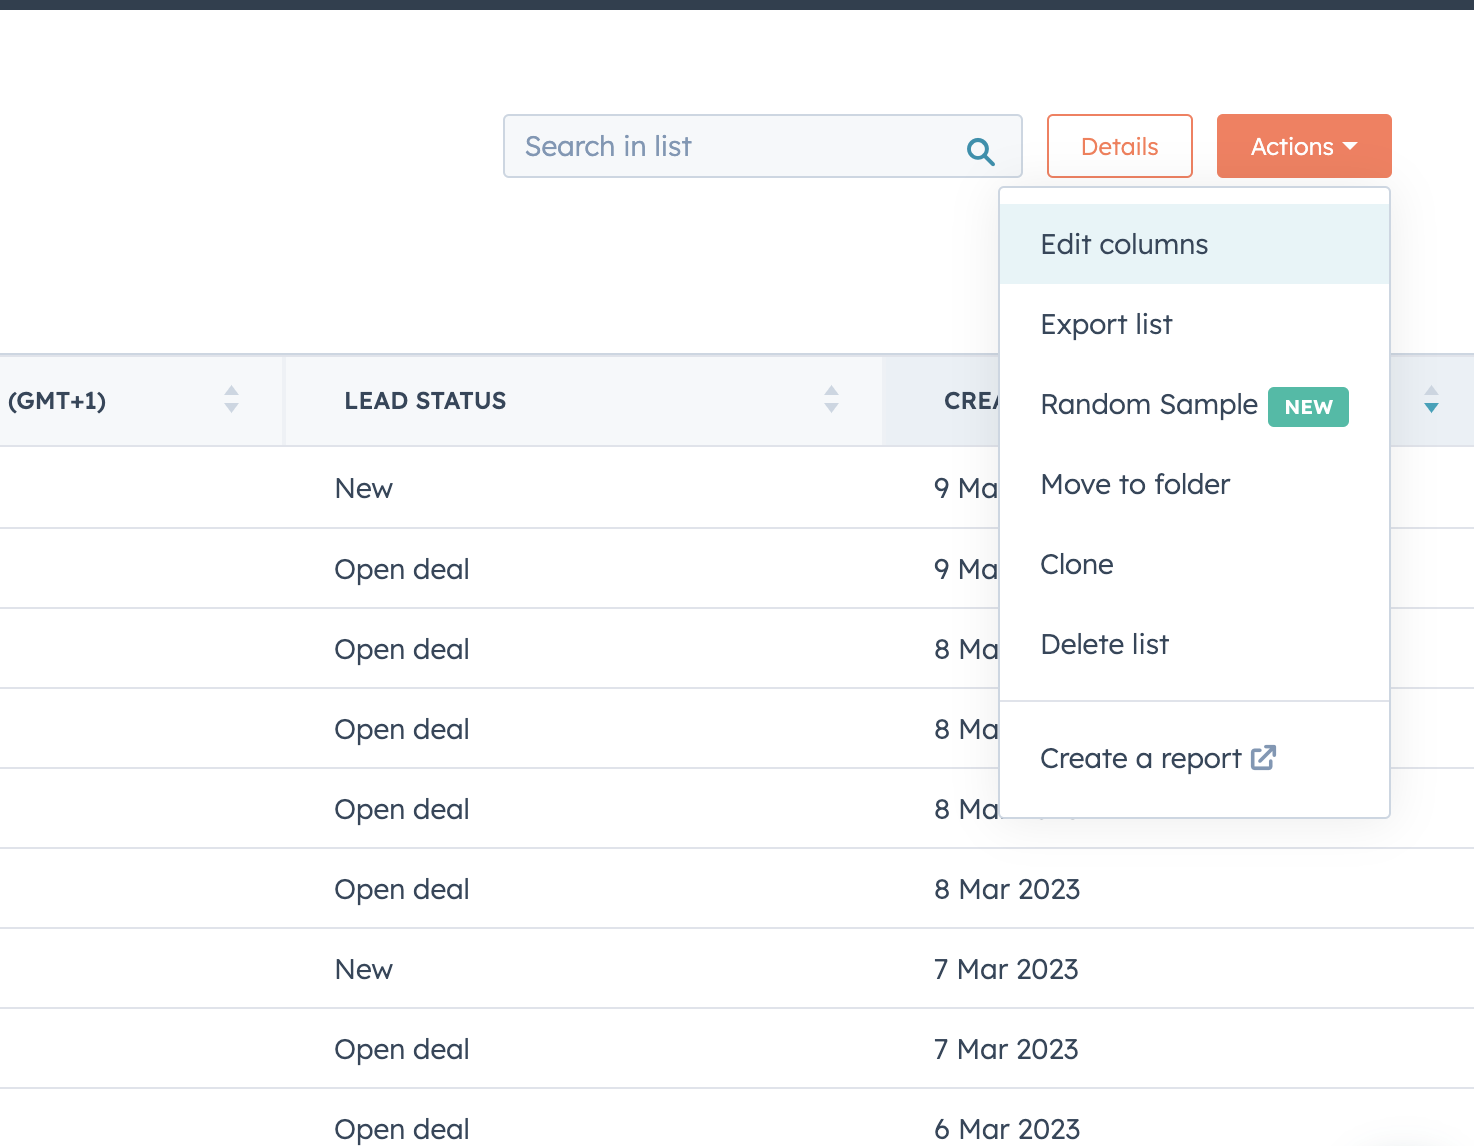
Random Samples
The third new feature that HubSpot introduced is the ability to pull random samples from a list. This means that you can easily select a small portion of contacts from a list to test and optimize your marketing campaigns across tools like email, CTAs, and landing pages.
Why is this feature useful?
Because it allows you to experiment with different variations of your marketing messages and see which ones perform better. By testing with random samples, you can avoid biasing your results or affecting your entire audience. You can also save time and resources by testing with smaller groups before scaling up.
Source: HubSpot
How to use Random Samples?
To pull a random sample from a list, go to Contacts > Lists in your HubSpot account. Select the list that you want to sample from and click on Actions > Pull random sample.
You will be able to enter the number or percentage of contacts that you want to sample from the list. You will also be able to name and save your sample as a new list or overwrite an existing list.
Once you create your sample list, you can use it in any of your marketing tools, like email, CTAs, or landing pages.
Live Now 🚀 - Available to Marketing Pro+ Customers
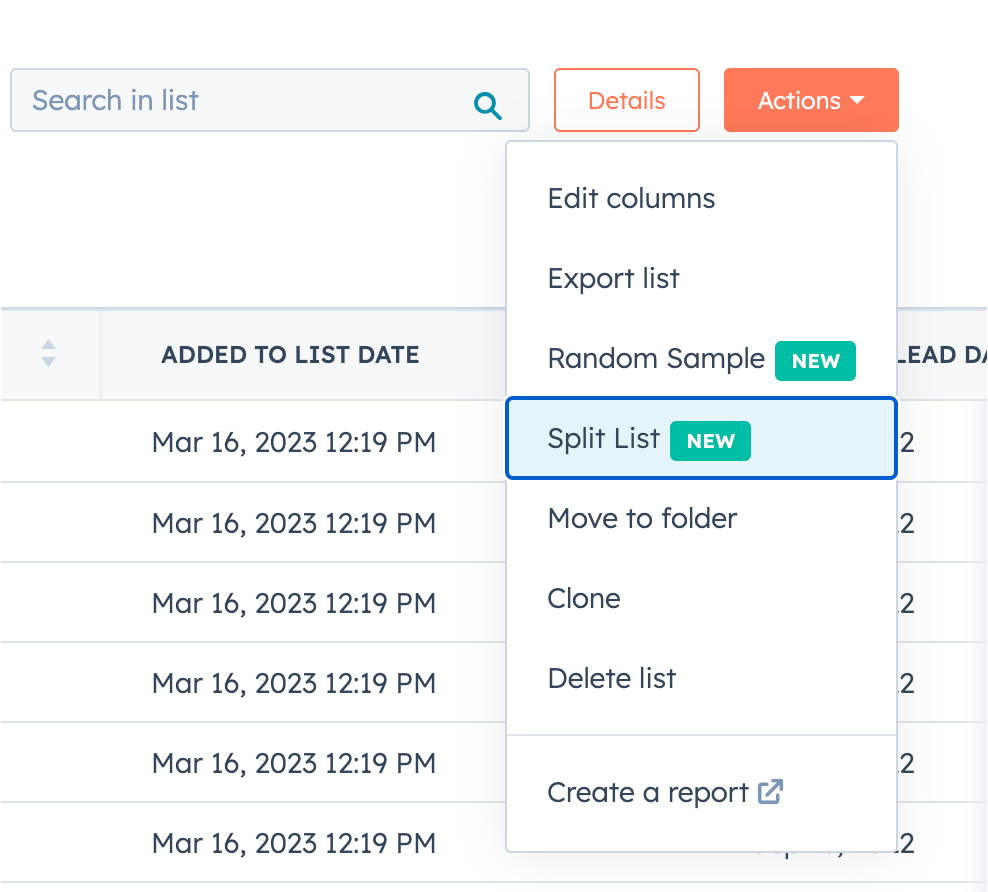
Random Split List
Lists Random Sample gave customers the ability to obtain one smaller cohort of a segment to experiment with. Split Lists go even further. Customers can now split an active or static list into up to 10 individual child static lists.
Why is this feature useful?
Split Lists allow you to create up to 10 subsets of an existing active/static list to test across different assets. For example, you can split a list of leads into 10 smaller lists and send them different email variations to see which one performs better. Or you can split a list of customers into 10 segments and offer them different incentives or discounts to increase retention or upsell.
Source: HubSpot
How to use Random Split Lists?
To use Split Lists, go to Marketing > Contacts > Lists and select an active or static list. Then click on the Actions dropdown and select Split List.
You can choose how many child lists you want to create (up to 10) and how you want to split them (by percentage or by the number of contacts).
You can also name each child list and add a description. Once you click Save, the child lists will be created, and you can use them for your marketing campaigns.
Public Beta 🤖 - Available to Marketing Enterprise Customers
Pop-up CTAs
Pop-up CTAs will allow customers to create a wide range of embeddable assets, such as banners or buttons. Available in Marketing and CMS hubs.
Why is this feature useful?
Pop-up CTAs are a great way to capture your website visitors' attention and drive them to take action. Unlike pop-up forms, pop-up CTAs offer more flexibility and customization options.
You can choose from different types of pop-ups (banner, slide-in box, dropdown banner, or modal) and different triggers (time on page, scroll percentage, exit intent, or manual). You can also design your pop-up CTA with different colours, fonts, images, and animations. And you can set up different goals for your pop-up CTA, such as redirecting to a landing page, opening a form, or starting a chat.

Source: HubSpot
How to use Pop-up CTAs?
Go to Marketing > Lead Capture > Pop-up CTAs and click on Create pop-up CTA. You can choose a template or start from scratch. Then you can customize your pop-up CTA with the editor and set up the settings and options. Once you are done, you can preview your pop-up CTA and publish it on your website.
Public Beta 🤖 - Available to Marketing and CMS Stater+ Customers
Pop-up CTA associations in Campaigns
Another new feature that HubSpot has launched is the ability to associate pop-up CTAs with your campaigns. Pop-up CTAs are a type of call-to-action that appear on your website as a modal window or a slide-in box.
Pop-up CTAs are currently in beta, which means that they are still being tested and improved by HubSpot. If you want to try them out, I can help you to get in.
Why is this feature useful?
Popup -CTAs are designed to capture the attention of your visitors and encourage them to take action, such as downloading an ebook, signing up for a webinar, or requesting a demo. What if you want to track how your pop-up CTAs are contributing to your marketing campaigns? That's where this new feature comes in.
This feature will help you measure the performance of your pop-up CTAs and see how they are influencing your campaign metrics, such as visits, contacts, customers, and revenue.

Source: HubSpot
How to associate Pop-up CTAs with campaigns?
You can now associate your pop-up CTAs to your campaigns in Marketing > Campaigns. There you can see all your campaigns and their associated assets, such as landing pages, emails, social posts, and CTAs. To add a pop-up CTA to a campaign, simply click on the campaign name and then click on Add Assets. You will see a list of all your pop-up CTAs, and you can select the ones that match your campaign goal.
Live Now 🚀 - Available to Marketing Pro+ Customers
CMS Hub
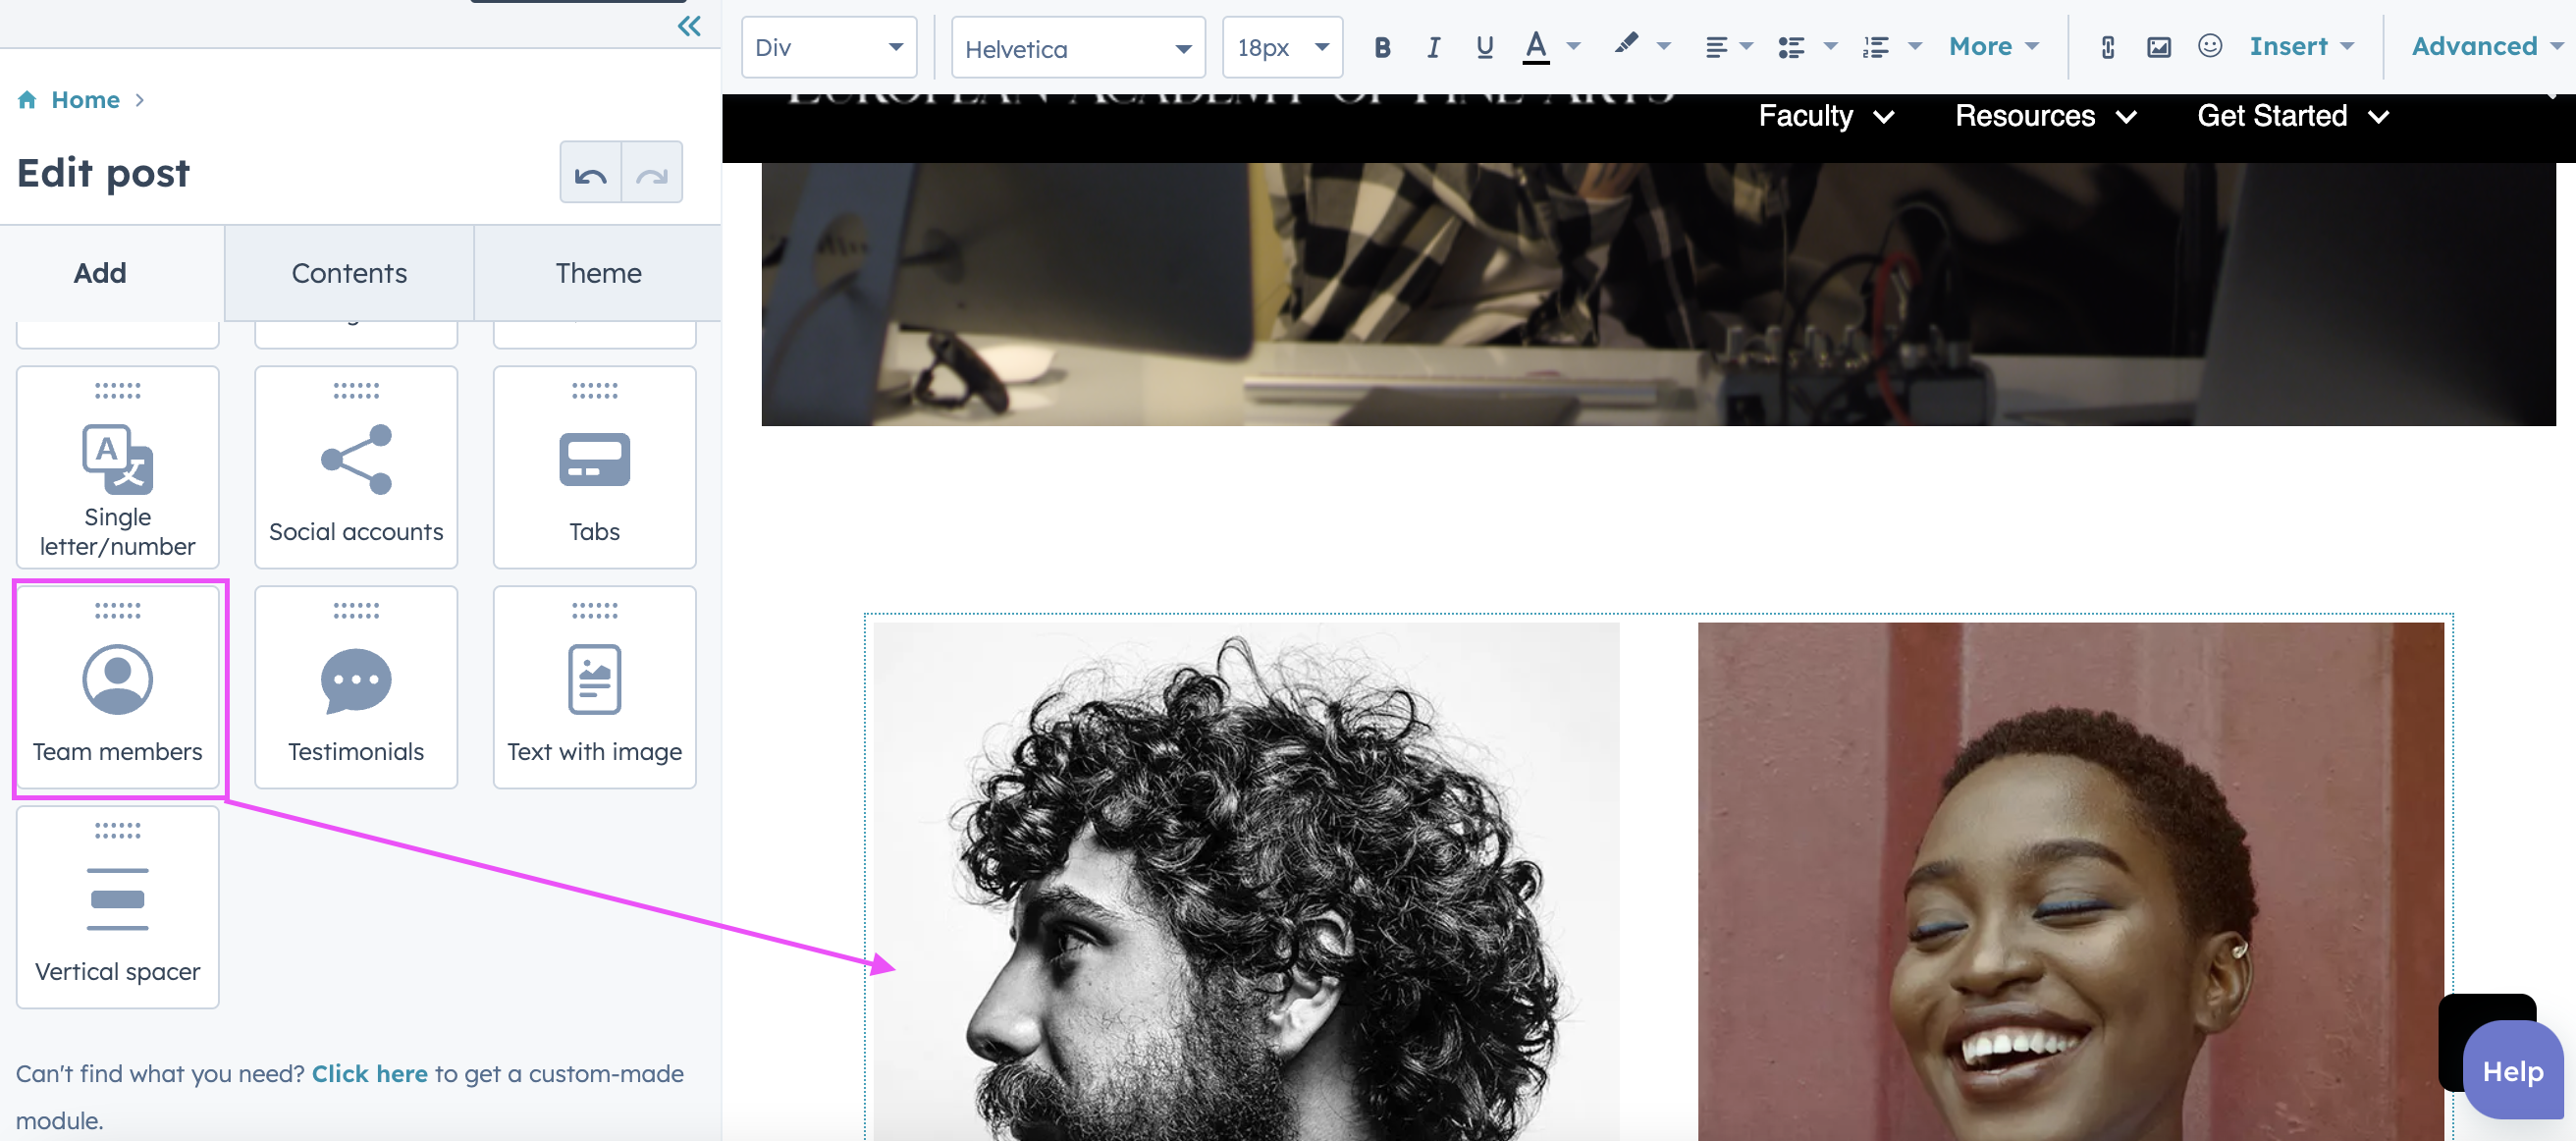
Drag and Drop Modules in Blog Post Editing
If you are a blogger or a content marketer, you know how important it is to create engaging and visually appealing blog posts. You want to use different elements such as images, videos, quotes, lists, tables, and more to break up the text and enhance your message. However, until now, adding these elements to your blog posts required some coding skills or going into Design Manager.
Why is this feature useful?
Using the Design Manager can be intimidating or inconvenient for some users who just want to focus on writing great content. That's why HubSpot has introduced a new feature that allows you to drag and drop modules into the rich text area of your blog posts. Modules are reusable components that you can use to add functionality or design elements to your blog posts.
Source: HubSpot
How to use this feature?
Go to Marketing > Website > Blog and create or edit a blog post. You will see a variety of modules that you can drag and drop into your blog post content area. For example, you can drag an image module to insert an image from your file manager or from an external URL. You can drag a video module.
Live Now 🚀 - Available to all CMS HubSpot Customers.
Sales Hub & Service Hub
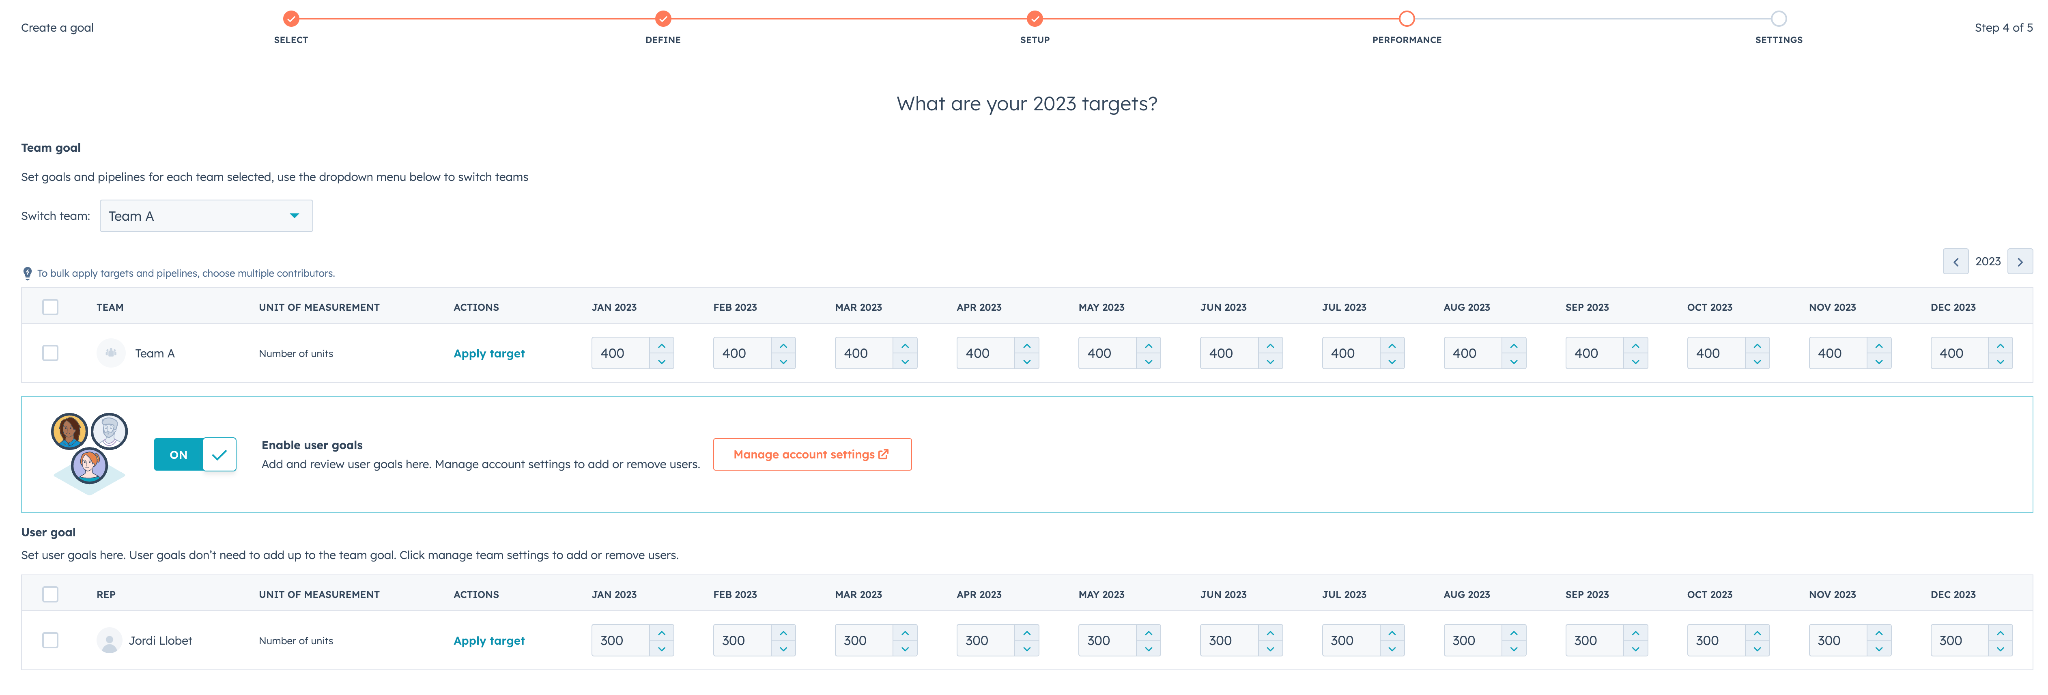
Team Goals
Team goals are more flexible now! 🤗
When creating a goal, customers can enter a team goal and a user goal(s) for users on the selected team in the same step. Additionally, customers can enter a team goal target that doesn't have to be a rollup of the users' (team members) goal targets.
Why is this feature useful?
Team Goals allow you to set different targets for your team and individual users based on your business needs and strategy. For example, you can set a team goal for revenue that is higher than the sum of individual users' revenue goals to account for potential churn or upsell opportunities. Or you can set a team goal for calls that is lower than the sum of individual users' call goals to encourage quality over quantity.
Source: HubSpot
How to use Team Goals?
To use Team Goals, go to Reports > Goals and click on Create Goal. From there, you can choose a metric that aligns with your business objectives, such as revenue, deals closed, calls made, or any custom metric that you define.
You can then set a target for your team goal and a target for individual user goals for each member of your selected team. This new feature allows you to create more flexible and tailored goals for your team based on your unique business needs and strategy. So, whether you want to encourage collaboration, competition, or a mix of both, Team Goals can help you achieve your desired outcomes.
Live Now 🚀 - Available to all Sales and Service Pro+ Customers.
Required Questions in Playbooks
Playbook authors and editors can now make questions required. If a question in a playbook is required, users will not be able to log an engagement or note, or update linked CRM properties until the question has been answered.
Why is this feature useful?
Required Questions in Playbooks help you ensure that your sales reps collect the essential information from prospects or customers before logging an activity or updating their records. This way, you can improve the quality and consistency of your data and avoid missing any important details that could affect your sales process.

Source: HubSpot
How to use required questions in Playbooks?
In Sales > Playbooks and choose a playbook or create a new one. Then, select a question that you want to make mandatory by clicking on Edit questions.
At the bottom of the question editor, you can toggle on the Required option and even add a validation message that appears if the user tries to log an activity or update a property without answering the question. By implementing these required questions, your playbook will demand users to answer before proceeding, resulting in more consistent and higher-quality data.
Live Now 🚀 - Available to all Sales and Service Pro+ Customers.
Service Hub
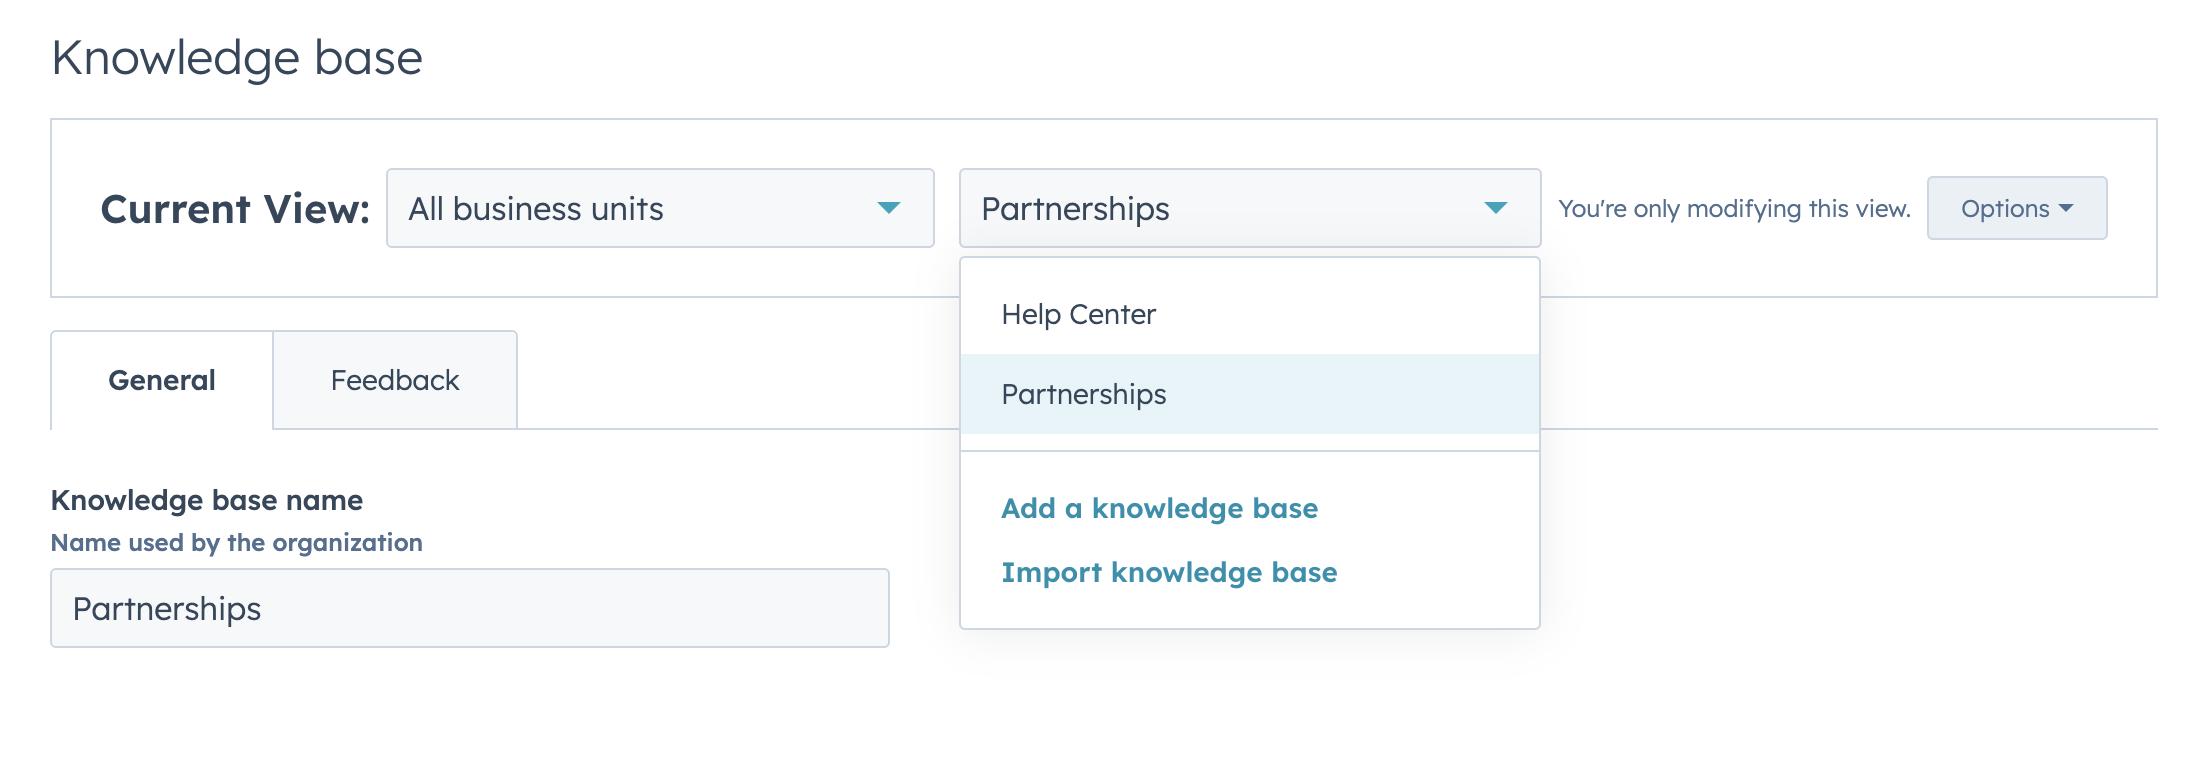
Multiple Knowledge Bases
One of the new features that HubSpot introduced is the ability to host multiple Knowledge Bases within one account. This means that you can create different Knowledge Bases for different audiences, products, brands, or needs. For example, if you have a software company that offers multiple solutions for different industries, you can create a separate Knowledge Base for each industry with tailored content and branding.
Source: HubSpot
Why is this feature useful?
Because it allows you to provide more relevant and personalised support to your different customer and prospect audiences, by segmenting your Knowledge Bases, you can ensure that your articles are targeted to each audience's specific needs and challenges. This can improve customer satisfaction, retention, and loyalty.
How to use this feature?
To create a new Knowledge Base, go to Service > Knowledge Base in your HubSpot account. Click on the dropdown menu next to your existing Knowledge Base name and select Create new knowledge base. You will be prompted to enter a name and a subdomain for your new Knowledge Base. You can also choose a template and a theme for your new Knowledge Base. Once you create your new Knowledge Base, you can start adding articles and customizing it according to your preferences. You can also manage your existing Knowledge Bases from the same dropdown menu.
Live Now 🚀 - Available to Service Hub Enterprise Customers.
App Marketplace & Integrations
Use Data from Event Integrations in Customer Journey Reports
Events are a powerful way to engage your prospects and customers, whether they are webinars, workshops, conferences, or any other type of online or offline event. But how do you measure the impact of events on your customer journey and your business outcomes?
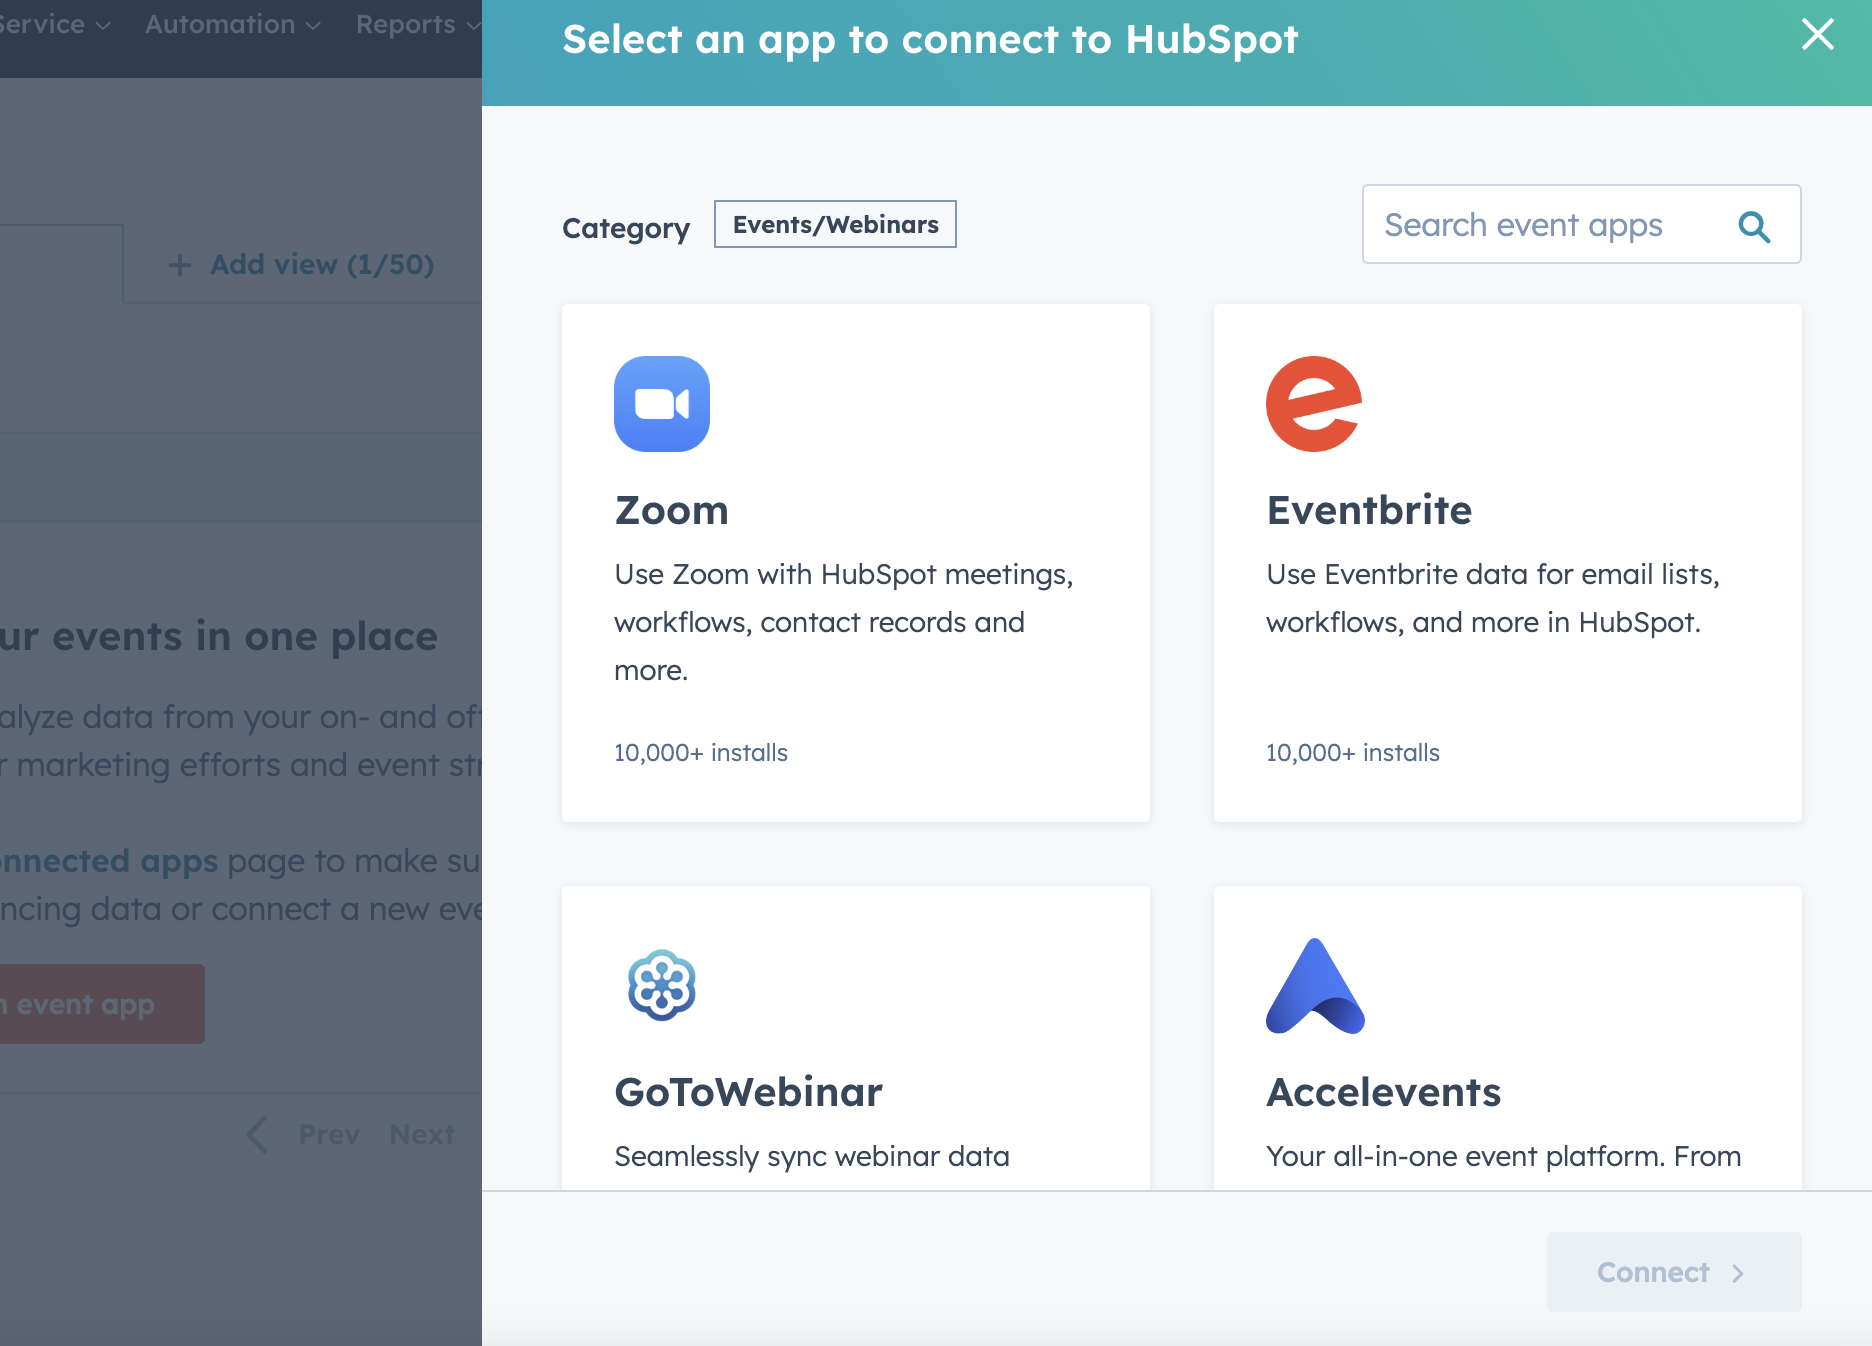
HubSpot has made it easier for you to answer this question by enabling you to use data from 18 event integrations in HubSpot’s App Marketplace in your customer journey analytics. These integrations sync event data–such as contacts’ registration, cancellation of registration, duration of attendance, and more–from popular event software to HubSpot’s marketing event object.
Source: HubSpot
Why is this feature useful?
You can now visualize and gain valuable insights into how events play a role in the customer journey. You can see how events influence conversions, retention, revenue, and customer satisfaction. You can also segment your contacts based on their event behaviour and tailor your marketing and sales strategies accordingly.
Using data from event integrations in customer journey reports can help you optimise your event strategy and improve your customer experience.
How to use this feature?
To use this feature, you need to install one of the supported event integrations from the App Marketplace and enable the sync of event data to HubSpot. Then, you can create or edit a customer journey report and select the event object as one of the data sources. You can then choose which event properties you want to include in your report and how you want to group them. For example, you can see how many contacts registered for an event vs how many attended or how long they stayed in the event vs how much revenue they generated.
Live Now 🚀 - Available to Marketing Hub Enterprise Customers.
HubSpot Embed for Zoho CRM Integration
If you are using Zoho CRM as your primary CRM system but also want to take advantage of HubSpot’s powerful marketing and sales tools, you will love the new HubSpot Embed for Zoho CRM integration.
The new HubSpot Embed provides you insights into contact, company, and deal records in HubSpot. You can also take action on these records and kick off automation from right within Zoho CRM. This means that you don’t have to switch between both systems to get a complete view of your prospects and customers. You can access all the information and functionality of HubSpot’s records timeline, association, automation, and more, all within Zoho CRM.
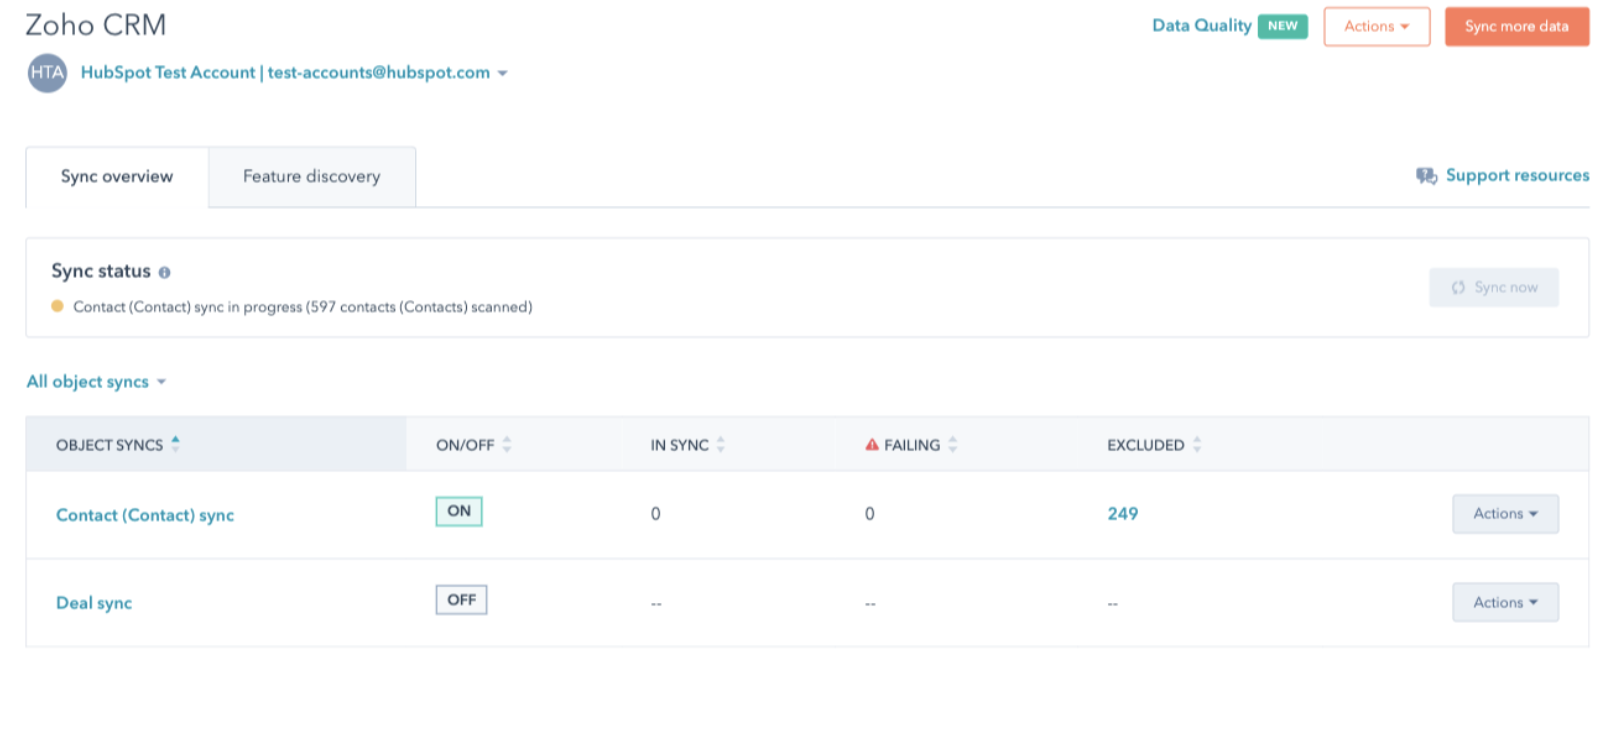
Source: HubSpot
For example, you can see a contact’s email opens, clicks, website visits, form submissions, and other activities in HubSpot’s timeline within Zoho CRM. You can also see which HubSpot lists or workflows they belong to and enrol or unenroll them as needed. You can also create or update contact, company, or deal records in HubSpot from Zoho CRM and vice versa.
How to use HubSpot Embed for Zoho CRM?
First, you need to install the HubSpot Embed for Zoho CRM integration from the App Marketplace and connect your HubSpot and Zoho CRM accounts. Then, you can enable the embed option for each record type (contact, company, or deal) in Zoho CRM. You can then access the HubSpot Embed icon on each record page in Zoho CRM and view or edit the corresponding record in HubSpot.
Using HubSpot Embed for Zoho CRM integration can help you streamline your workflow and enhance your collaboration between marketing and sales teams.
Live Now 🚀 - Available to all HubSpot customers.
One-way Ticket Sync with Salesforce Integration
If you are using Salesforce as your primary CRM system but also want to leverage HubSpot’s powerful service tools, you will appreciate the new one-way ticket sync with Salesforce integration.
Now users can sync Salesforce cases from Salesforce into HubSpot tickets. As Salesforce cases are created or updated in Salesforce, they will be sent into HubSpot.
This means that you can now use that information across the HubSpot platform. You can also import all your previous Salesforce cases into HubSpot to have historical insight into your customer’s support needs.
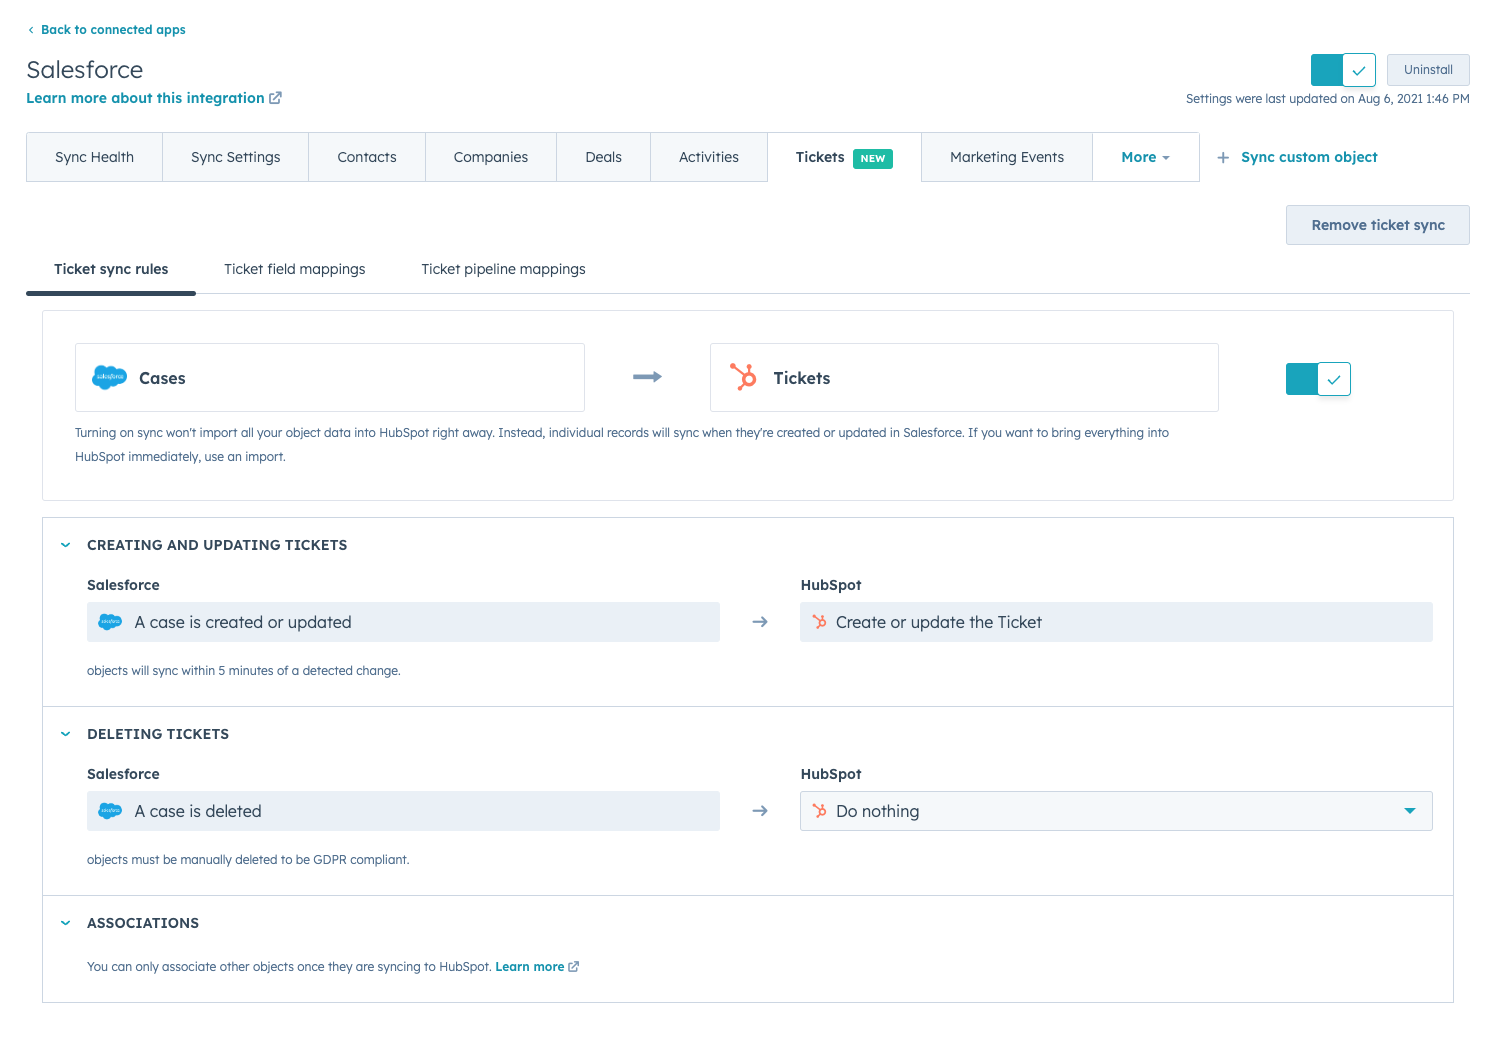
For example, you can use ticket data in HubSpot to create reports and dashboards that show your support performance and customer satisfaction. You can also use ticket data to trigger workflows and automation that help you resolve issues faster and improve customer retention. You can also use ticket data to segment your contacts based on their support history and tailor your marketing and sales campaigns accordingly.
How to use the One-way Ticket Sync with Salesforce?
To use this feature, you need to install the Salesforce integration from the App Marketplace and enable the ticket sync option in the settings. Then, you can choose which Salesforce case fields you want to map to HubSpot ticket properties and how often you want to sync them.
Public Beta 🤖 - Available to all Pro+ Customers
These are some of the latest updates that HubSpot has released for super admins. By using these features, you can take your marketing, sales and service operations to the next level and deliver better results for your business. If you want to learn more about these features or get help with setting them up, feel free to reach out. We are a certified HubSpot partner agency that can help you with your revenue operations, shaping HubSpot to your business needs.